Using the Optimisation Module
Note that the Optimisation module is an optional feature for SCP.
The Optimisation functionality gives you the ultimate in design flexibility. You can apply a minimum or maximum value (or both) to any input parameter or calculated output value, and then ask the computer to design for the minimum or maximum value of anything. So you could design the lightest (and therefore cheapest!) spring, or look for the shortest solid length, or maximum rate, or many other possibilities.
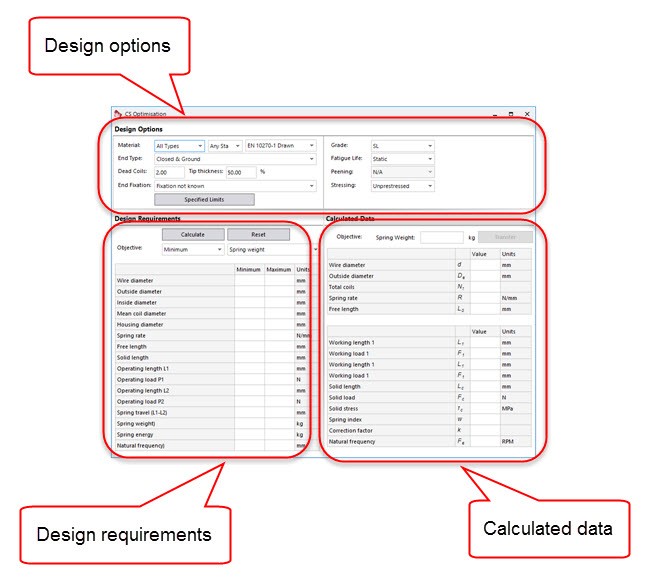
The optimisation window is split into three parts:
- The Design Options section covers the basic background information such as material, end type, fatigue cycle requirements (if any).
- The Design Requirements section allows you to set minimum and maximum values of any parameter shown.
- The Calculated Data section shows you the results of the optimisation.

Design Options
Most of these requirements are self-explanatory. Be sure to pick a suitable material grade, as the default will be the first one in the list and this may not be appropriate (for example if you go on to look at a fatigue requirement). However, it's important to understand the Stressing dropdown. This defines the limits that the software will work to. There are four options:
- Unprestressed - here the solid stress must stay below the unprestressed limit (the spring always stays elastic).
- Prestressed to solid - here the solid stress must stay below the prestressed limit
- Unprestressed, overstressed at solid - here the L2 stress must stay below the unprestressed limit (the spring stays elastic, but you must never compress it further than L2). We don't care how high the stress is below L2.
- Prestressed to L2, overstressed at solid - here the L2 stress must stay below the prestressed limit (again, you must never compress it further than L2). We don't care how high the stress is below L2.
Design Requirements
Here you can enter minimum or maximum values for any of the parameters shown. If you enter the same value for both minimum and maximum, it gives a specific requirement to aim for that exact value - this is common with working lengths, for example.
You also set the objective, which defines that output you care about, and whether you want a minimum or maximum value of it.
After the calculation is performed, any minimum/maximum values that are met exactly are shown in blue, and any that are violated are shown in red.
Calculated Data
After the optimisation calculation, the spring parameters are displayed in the two tables. The top part shows the basic spring design, the one below shows various other data.
Optimisation Example
We've been given a simple requirement from a customer:
At a length of 50 mm, a load of 50 N.
At a length of 30 mm, a load of 200 N.
We've been told it needs to be made from EN 10270-1 wire (drawn carbon steel, or music wire), but nothing else.
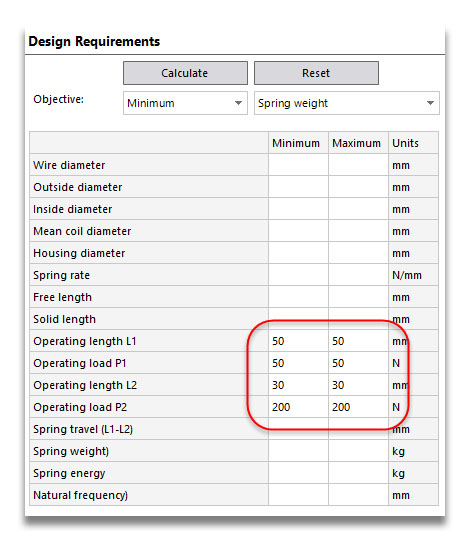
First of all, we change the material grade to DM, because we only use DM, SH and DH (if you're familiar with these grades, it's not important, but just an example of changing the grade). We leave everything else in the Design Options as it is. Then we enter those load and length requirements - setting both minimum and maximum to be the same so that we use those specific values:

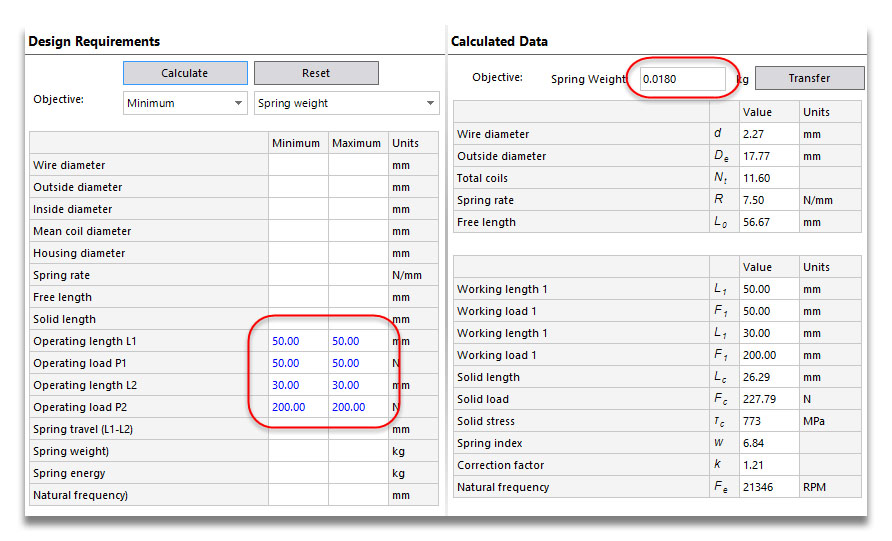
A progress bar is shown for a few seconds while the computer works, then we see the calculated spring. You can see that the weight is 0.0180 kg, and that the operating loads and lengths are shown in blue, indicating that they were met exactly:

That's ok, but we can do a little better by changing some of the design options:
- If we change to the higher strength DH grade, the weight reduces to 0.0131 kg, because the tensile strength has increased so we are working to a higher design stress.
- If we then change the stressing option to "prestress to solid", the weight reduces again to 0.00753 kg. This is less than half the weight of the first spring!
Suddenly the client comes back with a fatigue life requirement of 10 million cycles. If we put that in the Design Options drop-down, the spring becomes heavier, at 0.0256 kg. But if we then choose to shot peen the spring, the weight goes back down to 0.0114 kg.
Impossible constraints
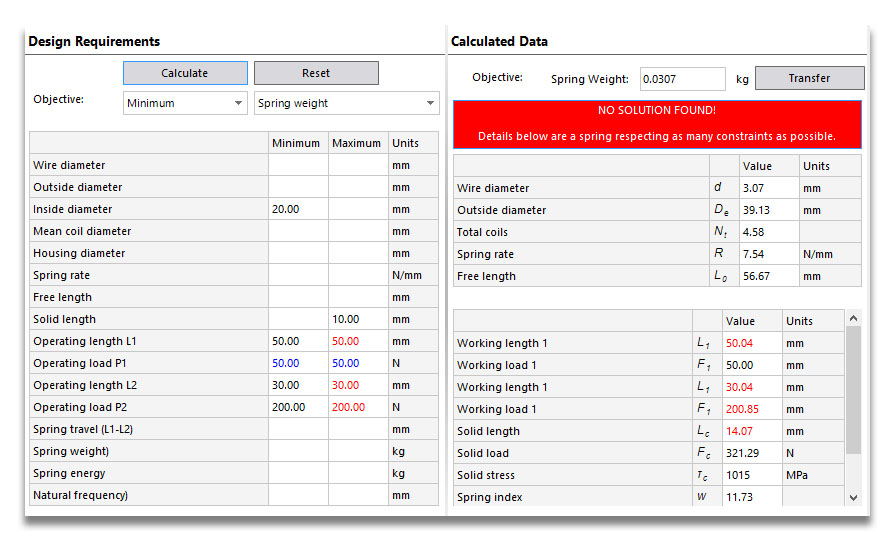
So far we've had it quite easy. But let's put in some requirements that are never going to be fulfilled, and see what happens. In the screenshot below we've put in a minimum inside diameter of 20 mm and a minimum solid length of 10 mm. The computer has a think about it, but makes it clear that there is no possible solution. Rather than give you nothing at all, a spring is shown that has the least possible geometrical constraint violations. In this case the loads aren't too far off, but the solid length is higher than required.

Sending the spring to the Validation window
By clicking on the Transfer button, you can analyse the current optimised spring properly, including all the usual output windows.
Saving the optimisation inputs
After the spring has been transferred, you can save it in the usual way. Any optimisation inputs used will be saved along with the design, so that you can load it back in, go back to the Optimisation window and see how it was calculated.